Open post

OSRS Kudos Guide

Players who are experienced with OSRS may already be familiar with the term Kudo, and for those who aren’t – Kudo is a reward system where you help the staff of the Varrock Museum and earn various rewards. You can view your Kudo points at the top-left corner of your client, and if you want to view both; the uncompleted tasks, as well as the Kudo points, you can head to the 1st floor of the museum and right-click the information booth.

Earning Kudos

There are four different tasks that you can complete to earn Kudos osrs, and these include, Cleaning Finds (50 Kudos), Orlando Smith’s Natural History Quiz (28 Kudos), Completing Quests for Historian Minas (75 Kudos), and Completing Fossil Exhibits (72 Kudos).

Cleaning Finds: For this part of the osrs kudos guide, You can locate the finds in the Dig Site (next to Sinco Doar) area after completing the primary quest ‘Dig Site’. Once completed, you can access the area and collect finds, and then head to the southern section of the 1st floor of the Varrock Museum to begin the process. To know the items that you require to clean them, speak to the archaeologist (Trowel, Rock Pick, and a Specimen Brush, along with Leather Boots and Gloves). Once you have the required items, go to the Specimen Table to clean your finds and later on display them to earn Kudos.

Orlando Smith’s Natural History Quiz: One of the easiest methods to obtain Kudos in this osrs kudos guide is completing the Natural History Quiz, in which you’ll be asked questions related to creatures that exist throughout Gielinor and you have to get at least three correct. You can start this quiz by speaking to Orlando Smith, and the answers can be obtained from the plagues located within the Varrock museum. There are a total of 14 exhibits, providing you with three questions per exhibit, and for answering three questions accurately, you’ll earn 2 Kudos.

Completing Quests for Historian Minas: After completing a quest, you can head to Historian Minas on the 2nd floor of the Varrock Museum and turn in your efforts to earn Kudos. You may also receive Antique Lamps for additional experience. These quests include; Demon Slayer, Rune Mysteries, and Shield of Arrav for F2P (Free to Play) players, and A Tale of Two Cats, Hazeel Cult, In Aid of the Myreque, Making History, Merlin’s Crystal, Observatory Quest, Priest in Peril, Temple of Ikov, The Grand Tree, and What Lies Below for P2P (Pay to Play) players.

Completing Fossil Exhibits:

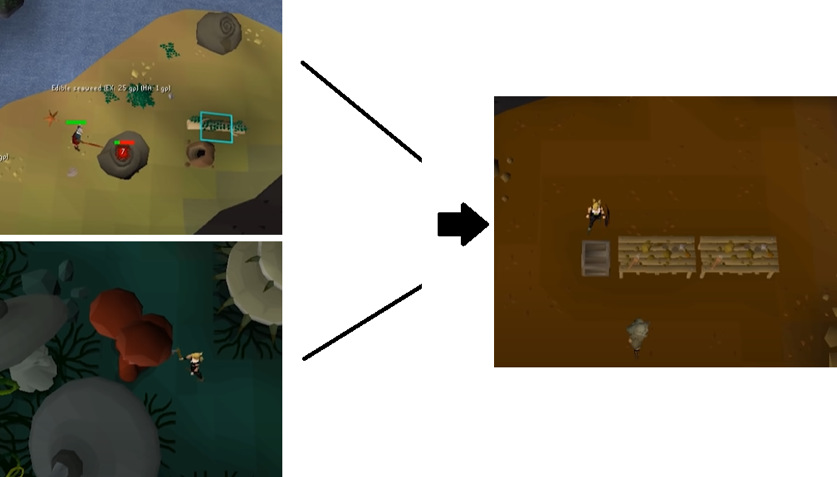
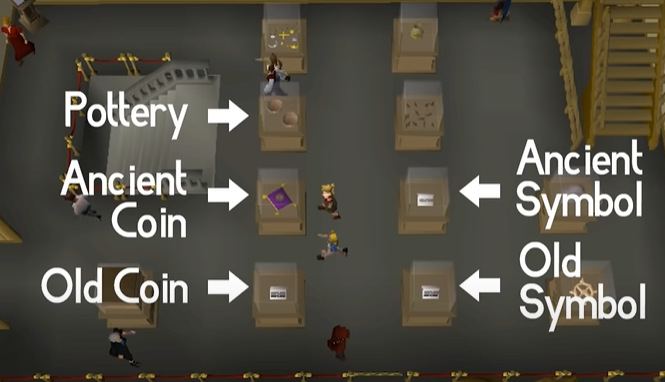
Similarly, you can also earn through Fossils. However, this technique can only be used after the completion of the quest Bone Voyage. At the Varrock museum, you’ll notice that there are several empty display cases, and these cases must be filled with Fossils. When you go to the Natural History Floor, you’ll be able to see a set of stairs – climb down and you can view the displays that need to be filled in those cases.

For creature displays, you’ll need the following parts; Pelvis, Skull, Spine, and a set of Limbs & Ribs.

For plant displays, you’ll need the following parts; Roots, Brand, Mushroom, Leaf, and Stump.

How To Access the Fossil Island?

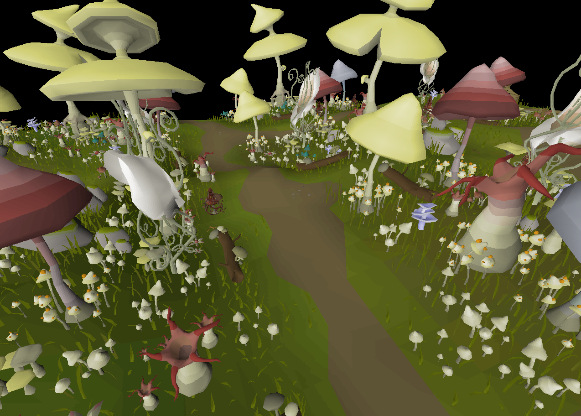
The fossil island is located in the north-eastern section of Morytania. The island is basically ‘Under Exploration’ by the Varrock Museum and only members can access it. There are several islands surrounding it, but you cannot access them and your limitation lie only till Lithkren (Dragon Slayer 2). To enter the area, you’ll need to have completed the quest Bone Voyage and to start this quest, you’ll need to have completed The Druidic Ritual and The Dig Site quests. The other requirement is that you will need 100 Kudos osrs, and similarly, The Dig Site will also require 153 Kudos to access.

Source: Best Runescape Service Seller – RSOrder!

Open post

D2R Paladin Hammerdin Build

The Paladin Hammerdin Build is the end game build that can get a player through nightmare and hell difficulty levels.

You’ll be starting off by teleporting to your enemy targets and spamming them with Blessed Hammer. It causes the hammer to spin around the character while inflicting immense damage on the enemies. Teleportation can be combined with Faster Cast Rate to move through the map swiftly, which is granted through the Enigma Runeword. Alternatively, you can use the Vigor Defensive Aura to increase your walking speed. During attacks, you’ll need to swap your teleportation skill with Concentration Offensive Aura to increase the damage output dealt by the Blessed Hammer.

The Paladin Hammerdin Build is intended for nightmare and hell difficulty levels that start around level 40 for D2R hammerdin build. It’s recommended that you start off with the Holy Fire Build and then switch to Hammerdin at a later stage. If you’re already doing that, and you want to switch to this build, you can do it by claiming the ‘Den of Evil’ reward from the NPC named Kara (Rogue Encampment). You’ll get 3 re-specs and you’ll need to be on the same difficulty level to claim it, for D2R hammerdin build.

Stat Distribution

Similar to most builds on the Diablo 2 Resurrected platform, the stat distribution for this build will focus on assigning the attribute points into Strength so that the equipment requirements can be met, for diablo 2 hammerdin. You’ll also need to add points into Dexterity to reach Max Block, and then add the remaining points into Vitality for additional life points.

You’ll need to assign enough points in Strength to equip your equipment. It will entirely depend upon the gear that you’re using, as well as the additional Strength bonus you’re getting from it. Points in Dexterity should be added to acquire Max Block (75%), and it’ll entirely depend upon the type of shield you’re using, for diablo 2 hammerdin. However, make sure to use the Holy Shield skill first and then add the point until 75% cap. The remaining points are going to be added in Vitality, and you don’t need to invest anything in Energy.

Important

If you have a Hellfire Touch and an Annihilus; it will greatly reduce your attribute points investment in Strength. Instead, you can utilize these two charms to obtain +10 to 20 points in every attribute and +10 to 20 points in Elemental Resistances, for blessed hammer diablo 2. If you have both in your inventory, it’ll save about 20 to 40 stat points, which can then be used for Vitality to increase your health pool. The passive resistances that the charms offer will allow you to depend less on +All Resistance gear.

However, if you don’t have an Annihilus or a Hellfire Touch already, you need to stop what you’re doing and focus on obtaining them. The perfectly rolled ones are quite costly, but you can always opt for the bad ones at an affordable price, and then for blessed hammer diablo 2, you can upgrade it when you have enough gold.

Skills

Blessed Hammer calls upon a Magical Hammer which spins outwards to damage the enemies that try to cross your path. The concentration offers an offensive aura to reduce interruption between your attacks. It also increases your overall damage by a percent. Holy Shield increases block chance, as well as your Shield’s defense. The charge isn’t a combat skill, so you should consider assigning it to a hotkey for quickly charging towards a selected position or enemy target. Vigor enhances the movement speed to cover the map without delays, or to flee in dangerous situations. Redemption is an optional skill to utilize if you’re having Mana-related issues. It purifies the bodies and offers Mana & Life points to the player.

Weapons, Armor, and Accessories

Lore (Runeword), Javelins (All Rarities), Tarnhelm/Peasant Crown/Wormskull (etc.), Spirit (Runeword), Ancient’s Pledge (Runeword), Paladins Shield (All Rarities), Stealth (Runeword), Uniques like The Spirit Shroud, Skin of the Vipermagi, or Que-Hegan’s Wisdom (etc.), Gloves with defensive stats, Belt with Life and Resistances, Boots with Faster Walk or Run Speed, alongside Life and Resistances, Ring with Life, Stats, and Resistances, Amulet with Stats, Health, Resistances or additional Paladin Skills, and Charms with additional Life, Mana, and Paladin or Combat Skills.

Max Level Equipment

Harlequin Crest (Unique)/Crown of Ages (Unique), Heart of the Oak (Runeword), Spirit (Runeword)/Herald of Zakarum (Unique), Call To Arms (Runeword) + Spirit Shield (Runeword), Enigma (Runeword), Magefist (Unique), Arachnid Mesh (Unique), Hotspur (Unique)/War Traveler (Unique)/Sandstorm Trek (Unique), Bul-Kathos Wedding Band, and Crafted Amulet/Mara’s Kaleidoscope.

Open post

New World Arcana Leveling Guide

Arcana is a part of the seven crafting-based trade skills. The grind is definitely worthwhile, but you need to have an appropriate plan prior to starting leveling up. You also have the option to choose from any of the seven professions, such as Jewel Crafting. As you level up, you will unlock various new things that will help you through your New World journey. In the following guide, we will be covering the most efficient ways to level up your Arcana Trade Skill.

Arcana Crafting centers around potions, magical weapons, ice gauntlets, etc., and these items are known to be profoundly useful in combat scenarios, as they offer an advantage over the opponent. Arcanists with higher levels always have powerful items on them and can craft anything with a high gear score.

You can perform the training at an Arcane Repository, which is located in settlements or territories. To reach a specific tier level, you need to take on Town Project, which allows you to craft an item, for this New World Arcana Leveling. Every weapon that can be crafted requires a tier-level that needs to be met at the Repository that you’ve chosen, or else, you need to look towards another settlement.

Required Materials

To train your Arcane skill, you need to use gathering resources like mining, skinning, harvesting, and fishing. It takes a while to gather the materials, and here’s what you will need – Oil, Tier 2 and Tier 3 Magical Plants, Fresh Water, Steel Ingots, Tangle Wisps, Water Motes, Coarse Leather, and Hyssop.

Related Skills

You can always opt for additional EXP for some of the skills that are related to Arcane Crafting. The two major elemental resources for Arcanists are Harvesting and Mining, and here are the skills that you can reply upon – Logging, Smelting, Harvesting, Mining, and Fishing for New World Arcana Leveling.

Power Levelling

There’s no appropriate way to level up trade skills in the game, but there are several methods that can be utilized to speed up the process. You can construct the method that is ideal for you, and approach the most effective one to increase our levels.

Levels 0 to 20 (Tier 2 Arcane Repository)

Start by crafting 57x Common Blight Tincture (Requirement: 57x Water, 57x Earthspine Stem, and 57x Shockbulb Stem). Followed by 26x Common Angry Earth Coating (Requirement: 26x Oil, 26x Shockbulb Stem, and 26x Tendrilspine Fibers).

Level 20 to 40 (Tier 2 Arcane Repository)

Start by crafting 30x Common Angry Earth Coating (Requirement: 30x Oil, 30x Shockbulb Stem, and 30x Tendrilspine Fibers). Followed by 109x Common Angry Earth Coating (Requirement: 109x Oil, 109x Shockbulb Stem, and 109x Tendrilspine Fibers), and 109 Common Blight Tincture (Requirement: 109x Water, 109x Earthspine Stem, and 109x Shockbulb Stem).

Levels 40 to 60 (Tier 2 & 3 Arcane Repository)

Start by crafting 109x Common Angry Earth Coating (Requirement: 109x Oil, 109x Shockbulb Stem, and 109x Tendrilspine Fibers). Followed by 109 Common Blight Tincture (Requirement: 109x Water, 109x Earthspine Stem, and 109x Shockbulb Stem), 34x Strong Blight Tincture (Requirement: 34x Water, 34x Fungal Spores, and 34x Shockbulb Stem), 34x Strong Corruption Tincture (Requirement: 34x Water, 34x Fungal Spores, and 34x Water Mote), 48x Strong Mana Potion (Requirement: 48x Water, 48x Crystalline Lodestone, and 48x Shockbulb Stem), and finally, Strong Blight Tincture (Requirement: 48x Water, 48x Fungal Spores, and 48x Shockbulb Stem).

Levels 60 to 80 (Tier 3 Arcane Repository)

Start by crafting 62x Strong Mana Potion (Requirement: 62x Water, 62x Crystalline Lodestone, and 62x Shockbulb Stem), for this New World Arcana Guide. Followed by 62x Strong Beast Coating (Requirement: 62x Oil, 62x Fungal Slime, and 62x Shockbulb Stem), 267x Strong Mana Potion (Requirement: 267x Water, 267x Crystalline Lodestone, and 267x Shockbulb Stem), 267x Strong Beast Coating (Requirement: 267x Oil, 267x Fungal Slime, and 267x Shockbulb Stem), and finally, 267x Strong Angry Earth Coating (Requirement: 267x Strong Angry Earth Coating, 267x Fungal Slime, and 267x Tendrilspine Fibers) for this New World Crafting Guide.

Levels 80 to 120 (Tier 3 & 4 Arcane Repository)

Start by crafting 1036x Strong Mana Potion (Requirement: 1036x Water, 1036x Crystalline Lodestone, and 1036x Shockbulb Stem). Followed by 126x Powerful Blight Tincture (Requirement: 129x Water, 129x Cod Eye, and 129x Shockbulb Stem), 112x Powerful Fire Absorption Potion (Requirement: 112x Water, 112x Cod Eye, 112x Shockbulb Stem, and 112x Soulsprout), and finally, 112x Powerful Lost Ward Potion (Requirement: 112x Water, 112x Cod Eye, 112x Shockbulb Stem, and 112x Soulsprout).

Levels 120 to 160 (Tier 4 Arcane Repository)

Start by crafting 996x Powerful Fire Absorption Potion (Requirement: 996x Water, 996x Cod Eye, 996x Shockbulb Stem, and 996x Soulsprout), for this New World Arcana Guide. Followed by 996x Powerful Lost Ward Potion (Requirement: 996x Water, 996x Cod Eye, 996x Shockbulb Stem, and 996x Soulsprout), 110x Infused Health Potion (Requirement: 110x Water, 110x Azoth Water, 110x Earth Mote, and 110x Soulsprout Stem), and finally, 135x Infused Mana Potion (Requirement: 135x Water, 135x Dragon Fish Jaw, 135x Shockbulb Stem, and 135x Soulsprout Stem) for this New World Arcana Crafting Guide.

Levels 160 to 200 (Tier 4 Arcane Repository)

Start by crafting 1050x Infused Mana Potion (Requirement: 1050x Water, 1050x Dragon Fish Jaw, 1050x Shockbulb Stem, and 1050x Soulsprout Stem). Followed by 162x Orichalcum Fire Staff (Requirement: 15552x Orichalcum Ore, 23328x Starmetal Ore, 93312x Iron Ore, 55242x Aged Wood, 13608x Sand Flux, and 972x Fire Mote).

Open post

RuneScape Raksha Guide

Ready for an exciting challenge that is not in the form of a minigame but a boss? Yes, we’re talking about Raksha. You need to first complete the Shadow Colossus mini-quest to gain access to Orthen Oubliette, where the boss is inhabited. You can easily overcome this challenge by following this guide. So, let’s start!

Requirements

Shadow Colossus is a members-only RS3 Quest that requires very little time to complete. It’s of Novice difficulty so you’ll be able to overcome the challenge without any trouble.

Besides that, there are no real requirements to complete the journey; however, having maxed combat skills would be an advantage during the final battle. We recommend 99 Attack, Strength, Defense, Magic, Ranged, and Invention, alongside 67 Summoning, 95 Prayer, and 95 Herblore (Overloads).

Walkthrough

The objective is to get access to Orthen Oubliette and defeat Raksha. You can start by speaking to Laniakea who is located southeast of Anachronia. After that, head west and climb up the stairs to siphon the anima pool until you reach 100%. You’ll be taking 200 HP every time so keep an eye out.

Next, head downstairs to unlock the doors near the pools. You’ll now be followed into a dungeon by Laniakea, who then promptly exits due to the anima’s toxicity. Head to the entrance of Oubliette and speak with Zaros.

After a couple of cutscenes, there will be a dialogue from The Keeper, followed by Raksha being disturbed by a shadow anima container. This indicates that the mini-quest is now completed.

Fight Strategy

Raksha looks similar to a Terex (Dinosaur). You can solo and duo fight the boss (according to your preference). You can only battle Raksha once the mini-quest is completed.

The objective is to subdue the beast after its long hibernation as it has now been interrupted because of the shadow anima container being removed.

Raksha starts with 800,000 HP if you solo approach, and it gets doubled in duo play. You need to watch out for the accurate attacks that it possesses. The boss is capped at 120 Magic, 110 Attack, and 110 Ranged, so the unprotected attacks can easily scale up to 5,000 damage.

Speaking of its Defense, the level is capped at 85. It may seem like Raksha has no weaknesses, but ranged is a good approach to consider. It’s also immune to stuns and poison attacks, but you can switch to leech and reflect damage as they come in handy.

Phase 1

During the first phase, Raksha will auto-approach you with tail and charged attacks. A few shadow bombs and shockwave attacks will fly in too if the phase continues for a longer duration. Try to end it as quickly as possible for your own benefit.

Phase 2

During the second phase, Raksha will start poisoning your mind with shadow energy. You’ll notice shadow orbs spawning around you, after which, you need to quickly expel them or you’re good as dead. Make sure you clear all the pools before proceeding ahead.

Phase 3

During the third phase, Raksha speeds up its anima absorption. After a message that anchors you to the shadows, Raksha will start summoning shadow manifestation in the area. These manifestations boast 10,000 HP at level 160, so deal with them as quickly as possible and put your focus back on the boss.
Next, the Keeper will ask you to head into the antechamber, resulting in the shadow manifestations disappearing, and the anima pools to stop increasing Raksha’s strength. He’ll now start to follow you and the Keeper will activate a shield to trap the boss.

Now, Raksha reverts its starting health of 400,000 (phase three). You need to stay close for him to abandon his special attacks. Stick around and try to avoid the tail attacks, as well as a new attack called Erebus Charge.

Rewards

You won’t be seeing any items on the floor after defeating Raksha because the Keeper teleports the items away to an antechamber. You can pick them up from where the security projector is located. You can check the drop table for the entire list of items.

Conclusion

We hope the guide was helpful to you while completing the quest, as well as facing off with the RuneScape Terex known as Raksha, the Shadow Colossus. You’ll surely get better with future attempts until there our guide is always here for you. Good luck!

If You Need More Runescape 3 Gold, OSRS Gold, And Other Runescape Service, RSOrder Will Be The Best Choice!

Open post

World of Warcraft Druids: Their Power, and Why They’re Always Second Best

World of Warcraft has many classes to choose from. Unfortunately, most classes specialize in their one particular skill, and you may not change your characters class. Fortunately, there is one class that doesn’t specialize in any particular skill, but is very good at all skills. This class is the original class of World of Warcraft: The Druid.

Druids are a shape-shifting class, using magic to shift into many various creatures. All forms do different things very well, while not as well as the class that specializes in it. The Druids forms consist of Bear, Cat, Cheetah, Tree of Life, Moonkin, Dire Bear, and Flight Form. While the number of forms may seem overwhelming, and while each has its specific use, one form is often used most of the time depending on what talent tree is chosen.

The first form, Bear Form, is acquired at level 10 and increases armor by 280% of your normal armor value. This gives you the ability to mitigate damage, making you a tank (when fighting with friends, the tank will attempt to force the monster being fought to attack him). To be able to keep the fiend attacking you, you are given many abilities that will force the monster to continue to attack you. Bear form does not deal very much damage and should only be used to mitigate damage. Dire Bear form is eventually attained and will increase armor contribution from items by 360%. This form is most similar to a Warrior.

The second form attained is Cat Form. This form gives you the ability to stealth (turn invisible). You may pounce you opponents gaining the upper hand from the start of the battle, while dealing mass amounts of damage. Unfortunately, there are no armor increases in this form. This form is most similar to a Rogue.

The third form is the cheetah form. This form is attained at level 30, and simply increases speed by 30%.

The next 2 forms are both attainable at level 50, but are talent tree specific, so you may only use 1 of them. If you are a tank (in the feral talent tree), you will not have access to either of these. The Moonkin is a giant owl beast, and specializes in casting nature magic. They are often referred to as Boomkin, because of their ability to do mass damage very quickly, and Oomkin, because of how fast they run out of mana. The Tree of Life in the restoration tree specializes in healing power and will increase the benefit of all healing magic cast to everyone in your party. It also increases mana regeneration. Tree of Life is different from most other healing classes, because it can only cast heal over time spells, referred to as HoT. This can be very useful during boss fights that can freeze everyone, as your heals will continue to heal while no other healer can cast magic.

The final form attained is Flight Form. This allows you to take flight anywhere in Outland, and eventually Northrend. Flying Speed is increased by 60%. There is also an Epic Flight Form attainable by spending five thousand gold and completing a quest. Epic Flight Form increases flight speed by 280%

While the druid does not specialize in any one particular skill, they have the ability to do just about anything great, but not the best. This is supported by the fact that the druid class (restoration talent tree) dominates every other class in player-vs-player combat.

Posts navigation

1 2 3 4 5 6 7
Scroll to top